Introducing: The New Wireless Tag Android App
-
Quick access to temperature, humidity, lux data and motion event
The app has 3 pages: Event, Trend and Setup. Setup page is a wrapper of the HTML interface where you can do all the setup illustrated in sections below. Swiping right reveals the Trend page, for a glance of all the important information. Swiping another time reveals history of motion events (such as door open/close) and temperature events (such as temperature exceeding threshold) in the 1st page.
If you quit the app (e.g. by keep pressing back button) when the chosen page is not the Setup (3rd page), next time the app is launched, the HTML interface will not be loaded at app launch, resulting in much faster app launch than the old version of the app which required loading the HTML to do anything.
-
The New Home Page: Trend
As you keep pressing back button, you will end up in the 2nd page, Trend. If you press on the graph on the right half, you can access all of the stats / graph features without loading the HTML interface. On the other hand, if you like to setup a tag, just tap on the current temperature display (left of the graph), it will take you directly to the section for that tag in the HTML interface. If you tap on the icon it will allow you to assign a picture directly.
-
Unified search bar with category buttons
If you have many tags, you can enter search term in the search box. It will stay open when you swipe left/right, and the event & web interface will automatically only show the tags matching the search keyword or chosen category. For example, If you want to have a per tag motion event history display, just enter the name of tag in search box (the autocomplete will help you enter the full name with just a few key strokes) then swipe to the event history if you are not already on it.
-
Motion events overlaid on temperature trend
The app will load data from the cloud only when you try to view it. As soon as you view the Event page and scroll down to load enough data into the past, when you go back to the Trend page they will appear also on the graphs, helping you identifying the reason behind temperature/humidity changes (such as door open/close).

Step 1: Activate Your Ethernet Tag Manager
For Android devices, install our Android app from Google Play by searching "WirelessTag", follow this direct link. If you have any trouble installing it from Google Play, try installing the APK directly from here. For web access on PC/Mac, go to Web App Login.
Use the 12 digit serial numbers on your Ethernet Tag Manager to create a login. Keep the serial number in a safe place.
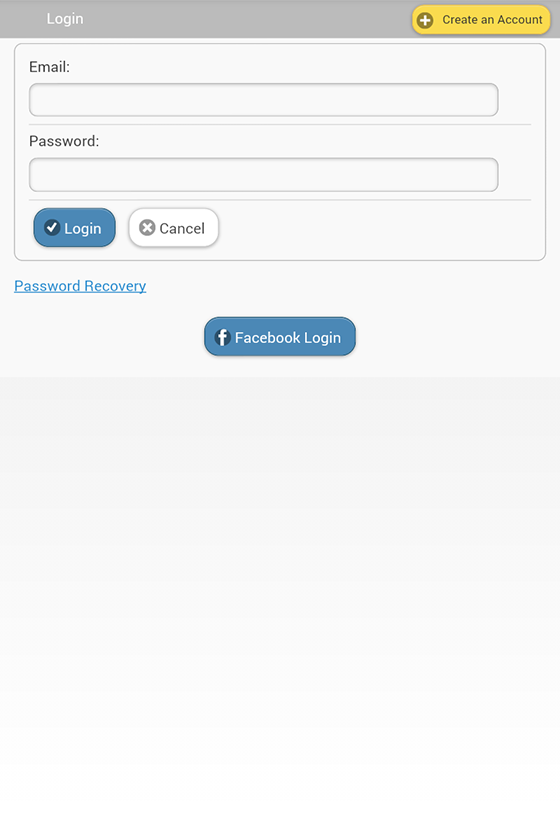
In the login screen, click "Create an Account" button.

Fill in the serial number (case insensitive), login email (used to recover password), and choose a password.

Click "Create" button to create an account. Uncheck "Allow creating more accounts..." unless you plan to create multiple logins to access the same Tag Manager.
Step 2: Associate New Wireless Tags
Follow this step to associate each new Tags with the Tag Manager. For water/moisture sensors, please activate by shorting the tip using a metal object (scraping the tip using a coin, for example) or dipping the tip into water. For other types, connect battery by pulling out battery insulating tab or attaching to external power (USB port). An orange (or orange/blue alternating) light should start flashing on the sensor for about 2 minutes, before the sensor goes into sleep again. Search & associate like other tags while the light is flashing.

First time when the app is launched, it may ask for the name to use to identify current device to enable/disable push notification later. Click "OK" and click the "+ Associate" button at the upper left corner.

A new tag periodically broadcasts information about itself when powered on. Click the "Search" button to receive this information.

When a new tag is found, its information is displayed. Assign a name and comment (optional) to the tag, then click "Associate".
Step 3: Assign Tag Names and Pictures (If Needed)
You can edit tag names and comments of each Wireless Sensor Tag. Pictures can be associated by using Android or iPhone/iPad app.
In the tag list screen, click on the tag you want to edit to open the detail pane and tap on the camera icon.

Take the picture and use finger to move or scale.
The picture is now assigned to the tag, and will be automatically visible on other devices accessing the same tag list in a few seconds.

In the tag list screen, click on the tag you want to edit to open the detail pane.

Click "More>" and click "Change Tag name". Enter new tag name and click "OK".

The new name is now assigned to the tag, and is automatically propagated to all other devices accessing the same tag list.
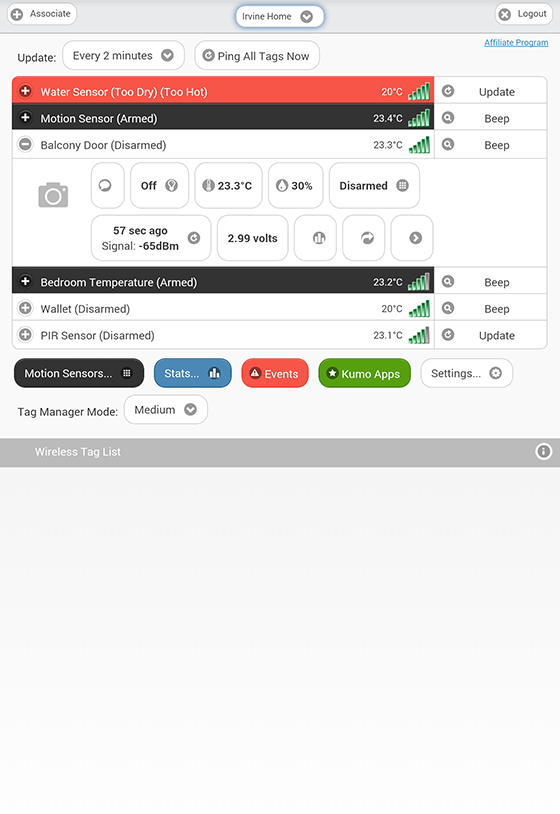
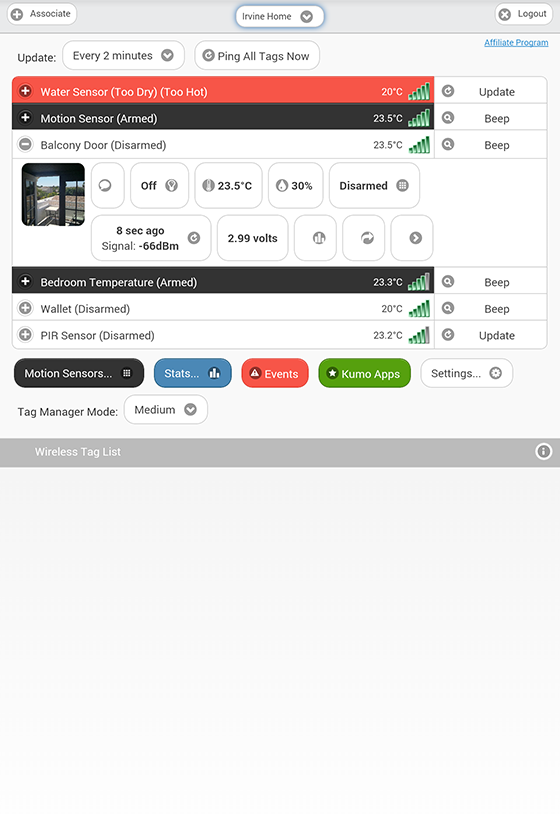
Step 4: Motion Sensor, Temperature Monitoring, and Logging Interval
Motion sensor and temperature (and humidity) monitoring are turned off by default. Follow the steps below to turn them on/off as needed. Temperature (+humidity, ambient light) logging happens independently of monitoring. The logging interval is set to 10 minutes by default, which can be changed as necessary.
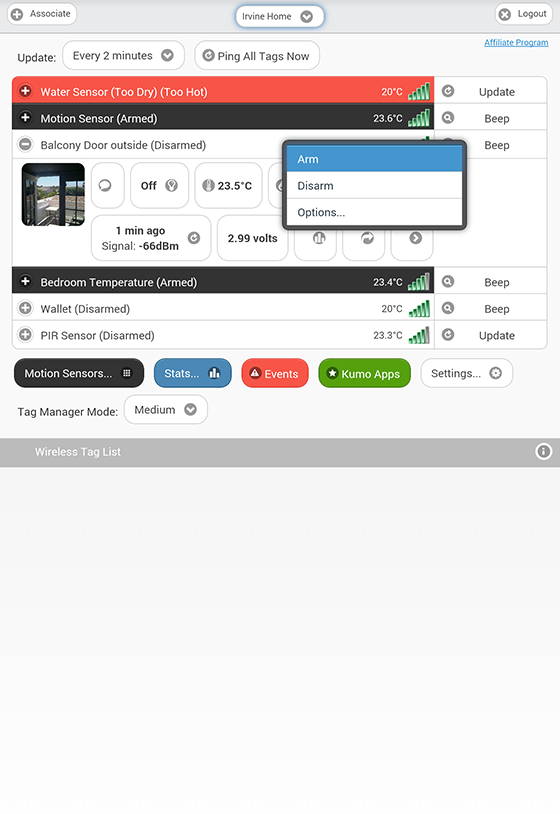
Click the tag of interest on the list screen to open the detail pane, and click the keypad button.

When motion sensor is armed, the tag on the list will have a black background.
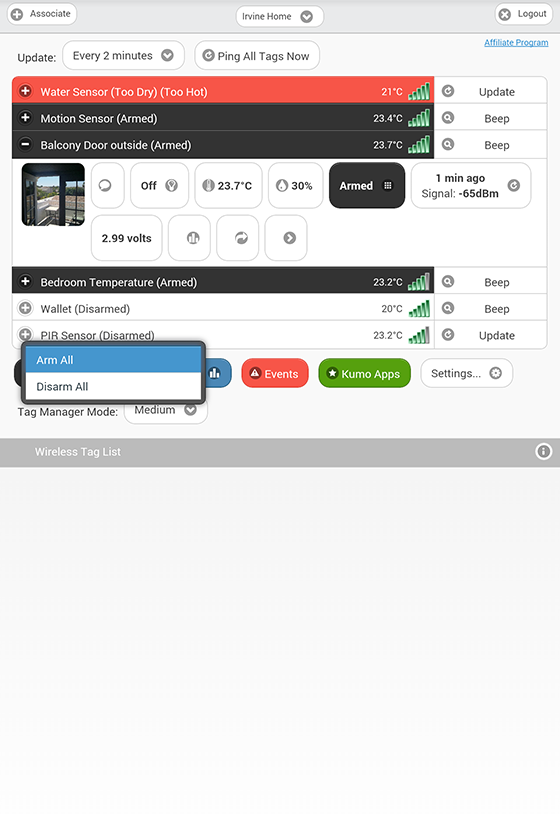
Instead of arming/disarming motion sensor for each tag individually, you can also click "Arm All" or "Disarm All" to arm/disarm all motion sensor tags.

Click on the temperature (or humidity, when available) button to open the Temperature (or the Humidity) Sensor Options screen. Choose the unit (°C vs. °F) here to update temperature display across the app.

Turn on "Monitoring", define normal temperature (or humidity) range, choose notification settings you want, and click "Save".

The tag will notify you when the temperature (or humidity) exceeds upper or lower limits, or returned within normal range.
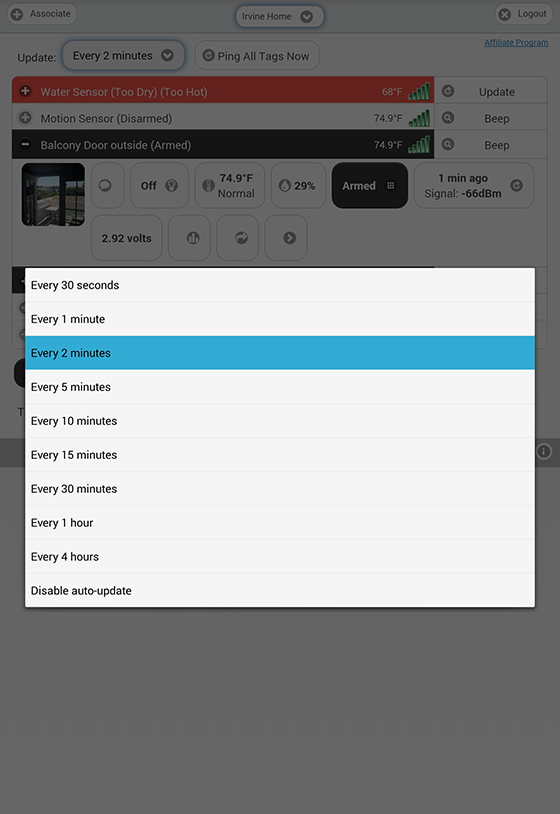
At the top of tag list screen, choose any of the Record: "Every ..." options. This is the data logging interval. The default is every 10 minute to balance battery life vs. amount of data logged and out-of-range notification delay.

Click on the refresh button under each individual tag allows you to set different record interval for each tag. The interval can be set between 30 seconds and 4 hours.

Choose "Notifications..." to enable/disable out-of-range/back-in-range notification. A tag becomes out-of-range when it misses a scheduled periodic update (which by default happens at record interval, or 13x the record interval with "transmit multiple data point" option)
Event History:
All past events, or only specific kind, or only from specific tag
The red "Events" button on the bottom of the screen opens "Event History".
All types of events (such as open/close/moved, too hot/cold, too wet/dry, out of range/back in range, water detected)
from all tags associated with
selected tag manager will be shown in chronological order. The newest events are displayed on top, while older and older events are dynamically downloaded from the cloud as you scroll down.
Events are collected 24/7 as long as the Tag Manager is connected to the Internet, so you can always review what happened while you were away.

Tap on the red "Events" button to open the "Event History" screen. Tap on the home button on the top left corner to go back to the tag list screen.
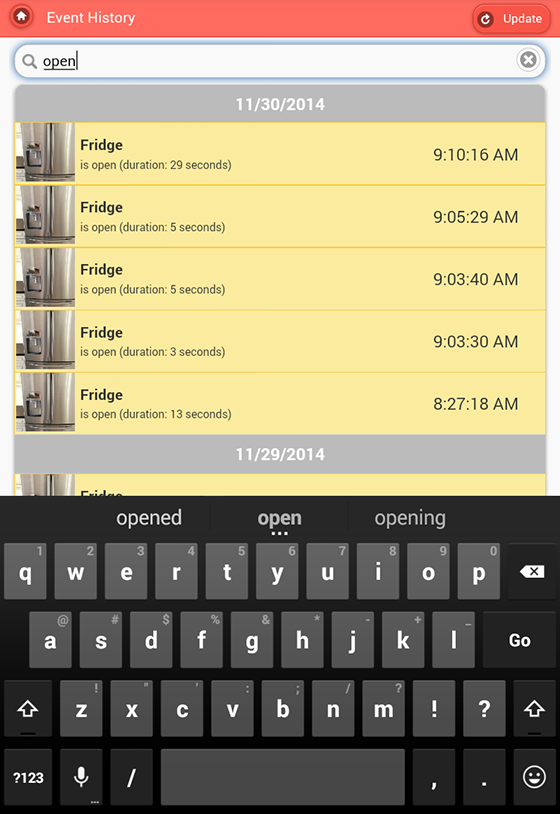
If you want to view only a specific kind of events, start typing the event name in the search box, such as "opened".
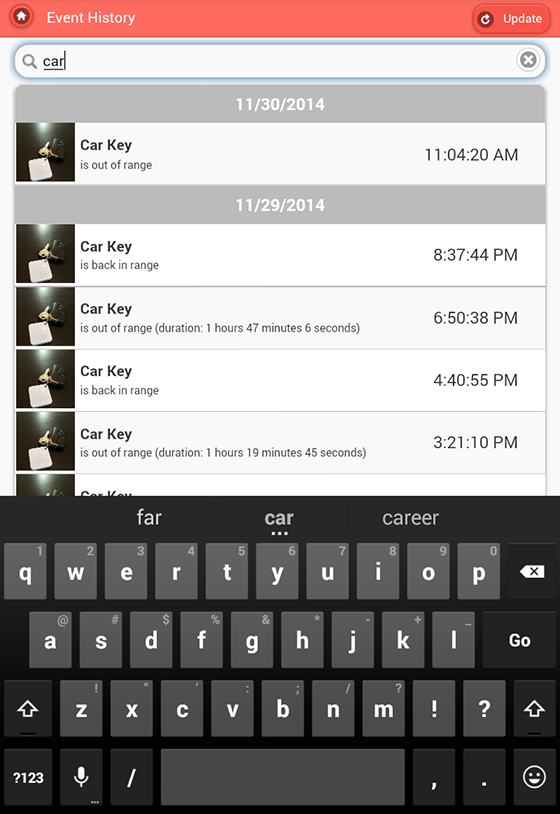
If you want to view all events from a specific tag, start typing the name of tag in the search box, such as "Car Key".
IFTTT: If This Then That.
The easiest way to link tags with other things on the Internet.
IFTTT is a free Web/iOS/Android app that connects all kinds of Internet-enabled products (such as sprinklers, lights and thermostats) and services (such as Gmail, iOS/Android device location, and more) referred to as "Channels". Wireless Sensor Tags is an officially supported IFTTT Channel.

Install and run the IF by IFTTT app from Google Play and create an IFTTT account.

After you login, click the "bowl" icon to open "My Recipes", and click "+" to install a recipe.

Click the search icon on the upper right corner and type "wirelesstag" to view a list of ready-to-use recipes made for Wireless Sensor Tags.
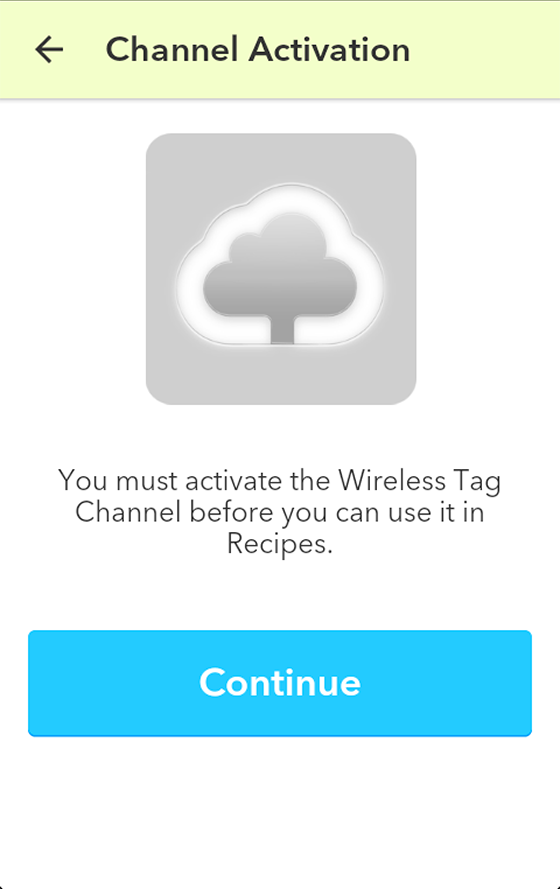
When you try to install one of these recipes for the first time, you will need to activate the Wireless Tag IFTTT Channel.

The app will redirect you to our website, where you need to login with your Wireless Sensor Tag account you created in Step 1.

Our website will ask if you want to grant API access to IFTTT. By doing so you allow IFTTT to read your tag events and perform actions on your tags without giving IFTTT your password, so that you can revoke this access anytime from Settings->Account.

If the Wireless Tag IFTTT Channel is activated (you only have to do this once) you can configure and install published recipes, or create your own using any of our 10+ triggers and actions.
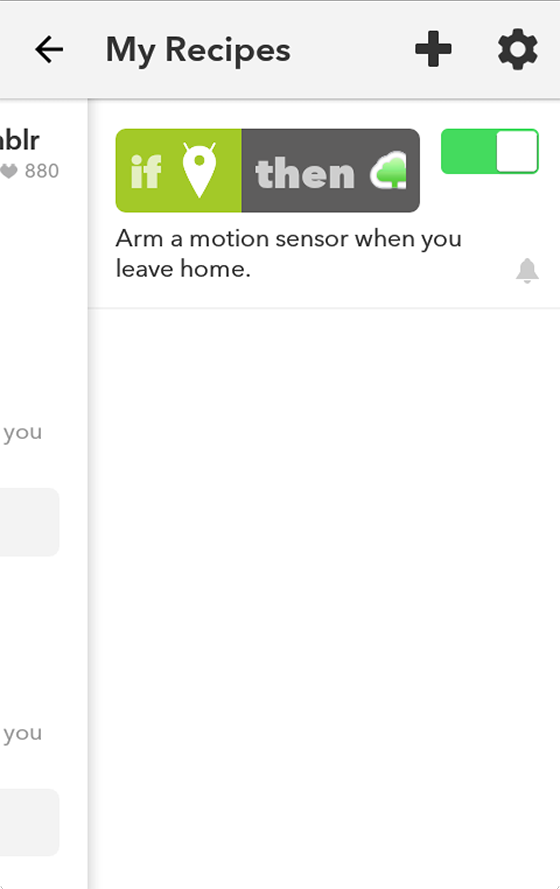
The list of your installed recipes will be shown under "My Recipes" where you can enable and disable each one, or tap on it to edit.
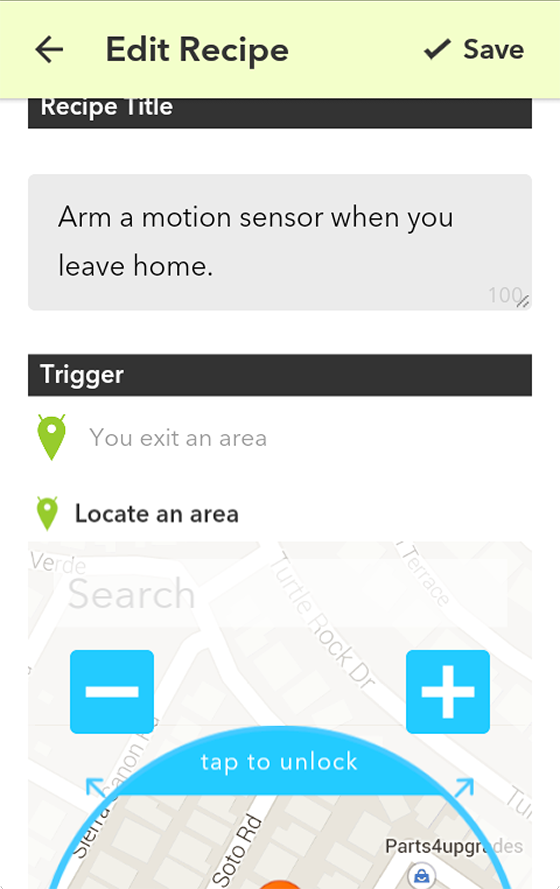
For this recipe "Arm a motion sensor when you leave home", editing screen allows you to pick the region on Google Maps. When your Android device leaves this region, the specified motion sensor will be armed.
Motion Sensor Options:
Sensitivity, Response, Notification Settings and Scheduling
Tune the sensitivity and responsiveness of the motion sensor to suit your application.
In motion detection mode, choose to remember moved state indefinitely or reset to armed state after a while.
In door/gate mode, choose the threshold angle (23 degree is recommended for automatic garage doors, 2~5 degree for regular doors),
or choose to get notified only when door is opened for too long.
Choose to get notified by emails, tweets, speech, or whether to make tag beep upon motion.
Set the schedule to automatically arm or disarm the motion sensor at certain time of the day, and days of the week.
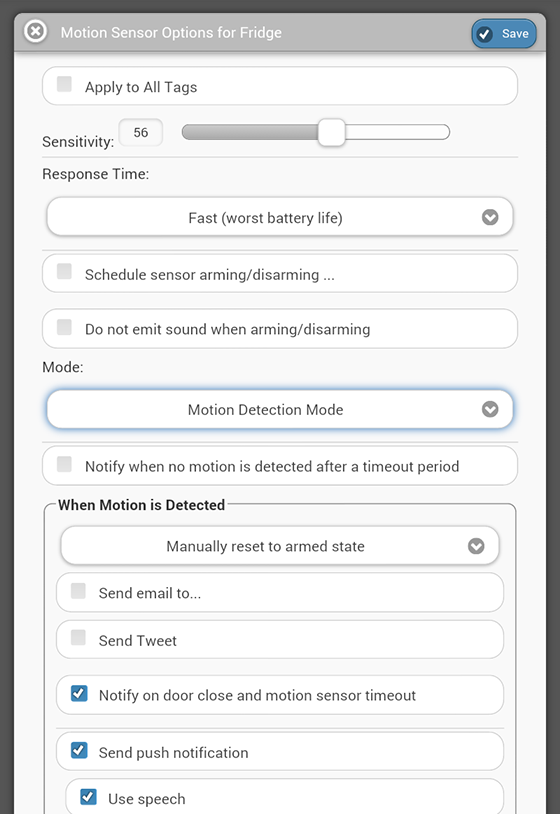
Click the keypad button to open Motion Sensor Options screen for an individual tag.

You can choose sensitivity (0 to 100, 50 is recommended to eliminate false alarms in most environment), and responsiveness ("Slow" is 5x the delay and battery life of "Fast") that best suit your application.

When door/gate mode is enabled, you can choose the threshold angle, when tag orientation changes more than this, the door is deemed open, when tag orientation returns within this threshold, it is deemed closed.
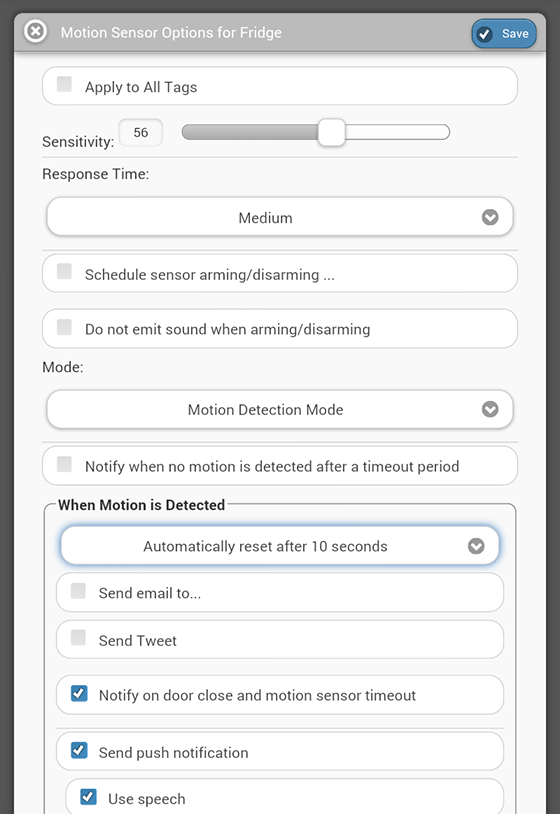
When not in door/gate mode, after movement is detected, by default the system remembers the tag has been moved indefinitely. Instead you can choose to have the tag automatically reset to armed state after a while.
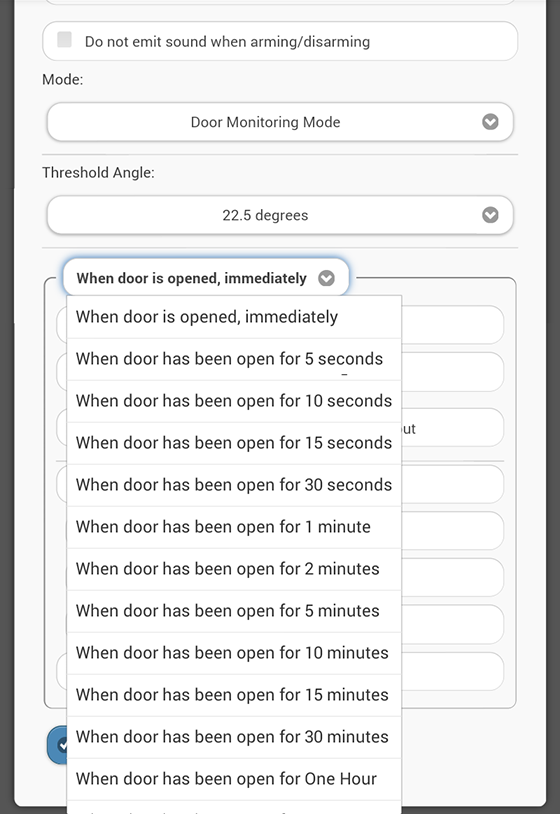
When in door/gate mode, you can choose to be notified only when it is been open for longer than a certain time period.

You can choose to be notified by email, have the system post a tweet on your Twitter account, beep or speak on your phones, or make the tag beep.
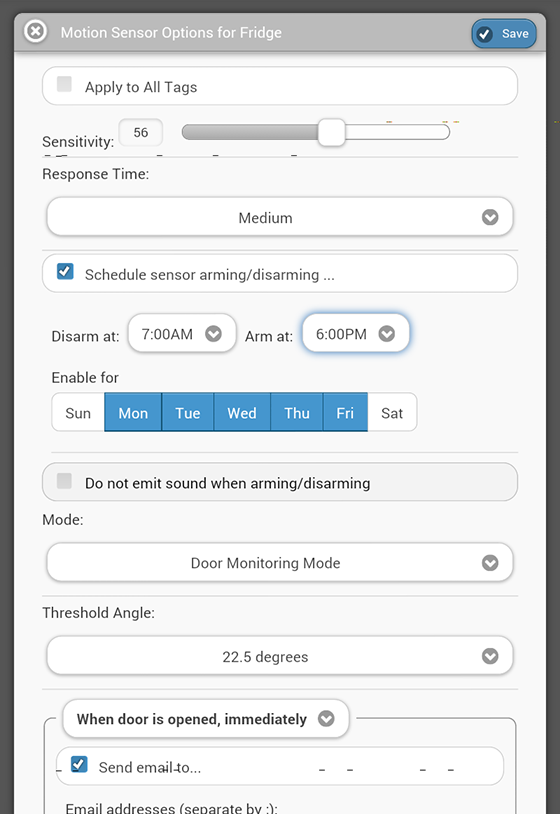

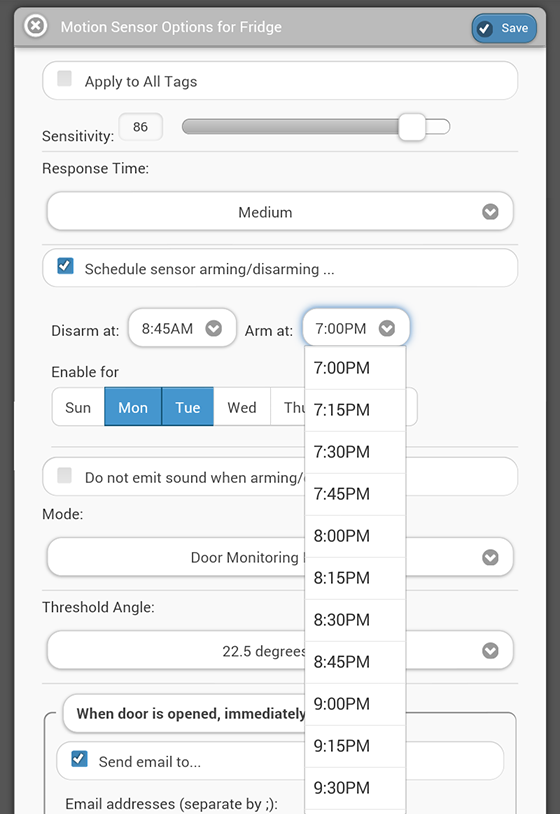
By setting an auto-arming/disarming schedule, you can specify time of day to disarm (for example, in the morning), and arm (for example, after dark), for each of the checked days of the week. To make motion sensor armed over the weekend, simply setting an "Arm at" time later than "Disarm at" time, and uncheck Saturday and Sunday.
Beeping a Tag, Stop Beeping, and Beep Options
Every wireless sensor tag has a beep function to help you find missing tags. Attach the tag to key chains, put inside your wallet, or strap to TV remote controls, and never waste time looking for these items again.

In the tag list screen, click on "Beep" button of the tag you want to beep.

You can choose beep until moved, for 5,10,15,20,30 seconds, or indefinitely beep until stopped by the stop beep button.

When tag responds and starts to beep, the "Beep" button turns into a blue "Stop Beep" button.
Temperature Graphs and Motion/Door Stats
Each tag automatically logs temperature and each time it is moved, opened or closed, so you can always check what happened while you were away.
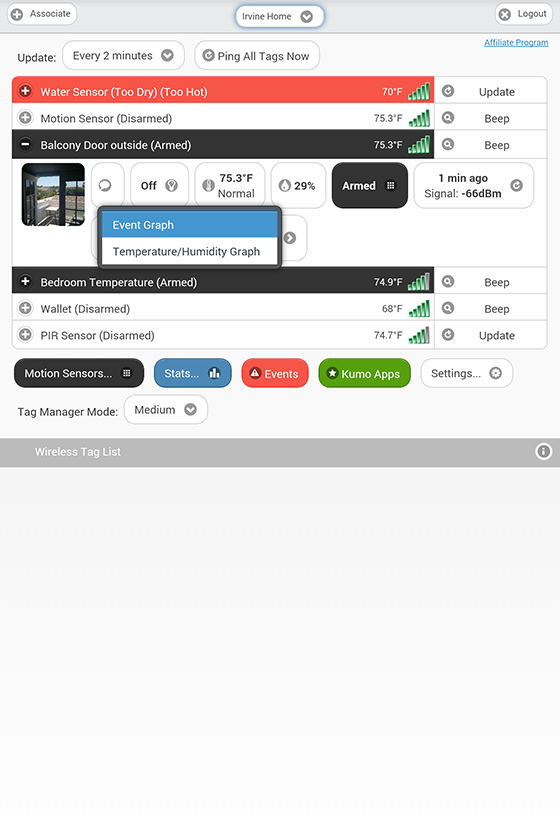
Temperature is logged periodically for each tag at the interval specified at Step4, "Out-of-range Notification." To view logged data, click the graph button and choose "Temperature Graph".

Initially, hourly (or if captured data range is long enough, daily high/low) graph will be displayed. Zoom in by pinch gesture to view raw data points.

Click the buttons at upper right corner to download all available raw data in one CSV file or send the current graph as an attachment.
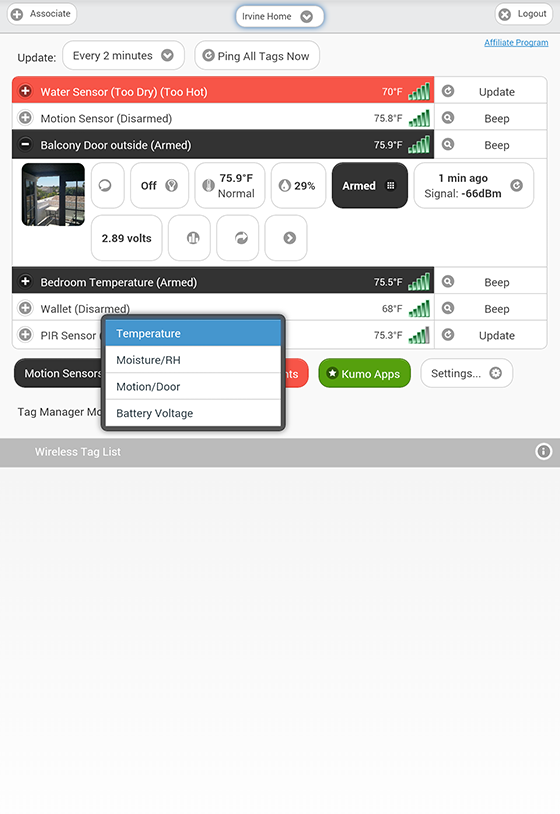
After there is enough data captured, click the blue "Stats" button at the bottom of the screen and choose the type of data you want to view.
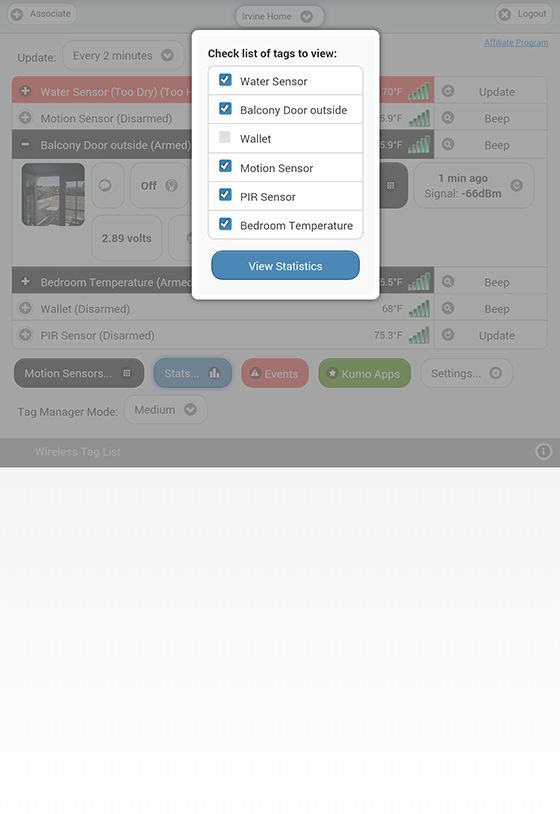
Choose which Tags / KumoSensors / Nest whose data you wish to view side by side.

Initially, hourly (or if captured data range is long enough, daily high/low) graph will be displayed side by side for all selected tags/sensors. Zoom in by pinch gesture to view raw data points.
Historical motion events for a single tag or multiple tags can also be visualized the same way.
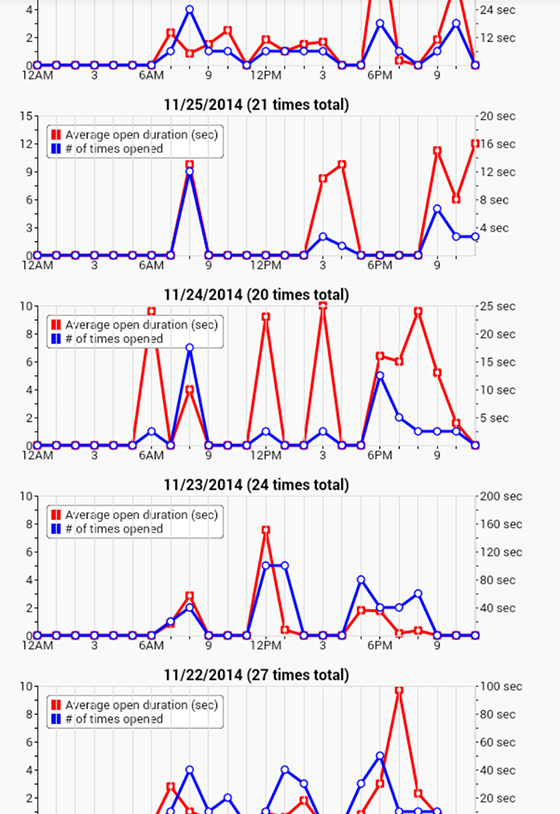
Number of times door is opened and average duration vs. time of the day are displayed. You can also download all available raw data in one CSV file.

When you click on anywhere on the graph for a particular date, a detail history for that date is displayed. You can sort by time of the day, how long the door has been open, or event type (opened or moved).
Custom URL Calling on Event
You can define a custom URL (such as REST endpoint of home automation systems) to be called on each type of event for each tag individually or all tags. Each URL may include placeholders such as "{0}" or "{1}" to be replaced with specific information from each event. With home automation systems such as Universal Devices Insteon/ISY or Phillips Hue Lamps that supports HTTP based API, you can turn on light when door is opened, or motion is detected, for example.

Click the ">" button then choose "URL Calling...".

Click on the event(s) you want to enable URL calling, and enter the URL of your REST Web service.
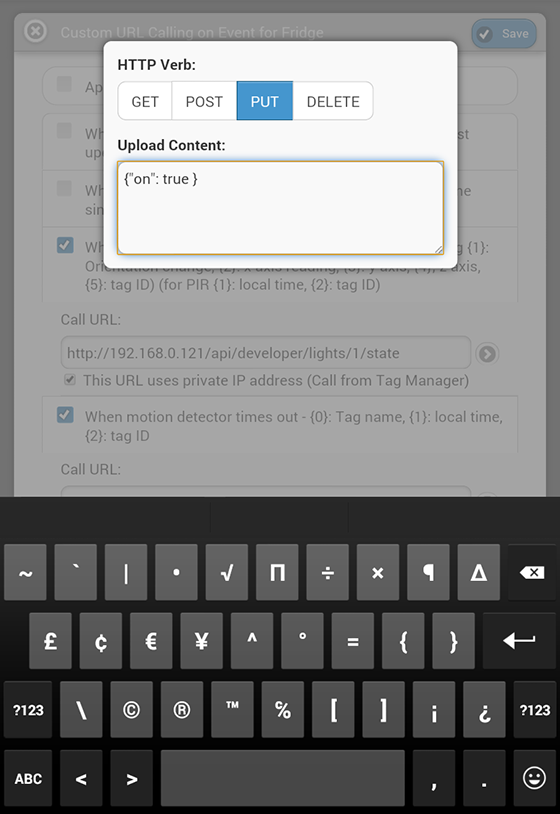
If the HTTP REST API you are calling requires HTTP Verb other than "GET" or requires argument to be sent in HTTP body, click on the ">" button at the right to specify these.
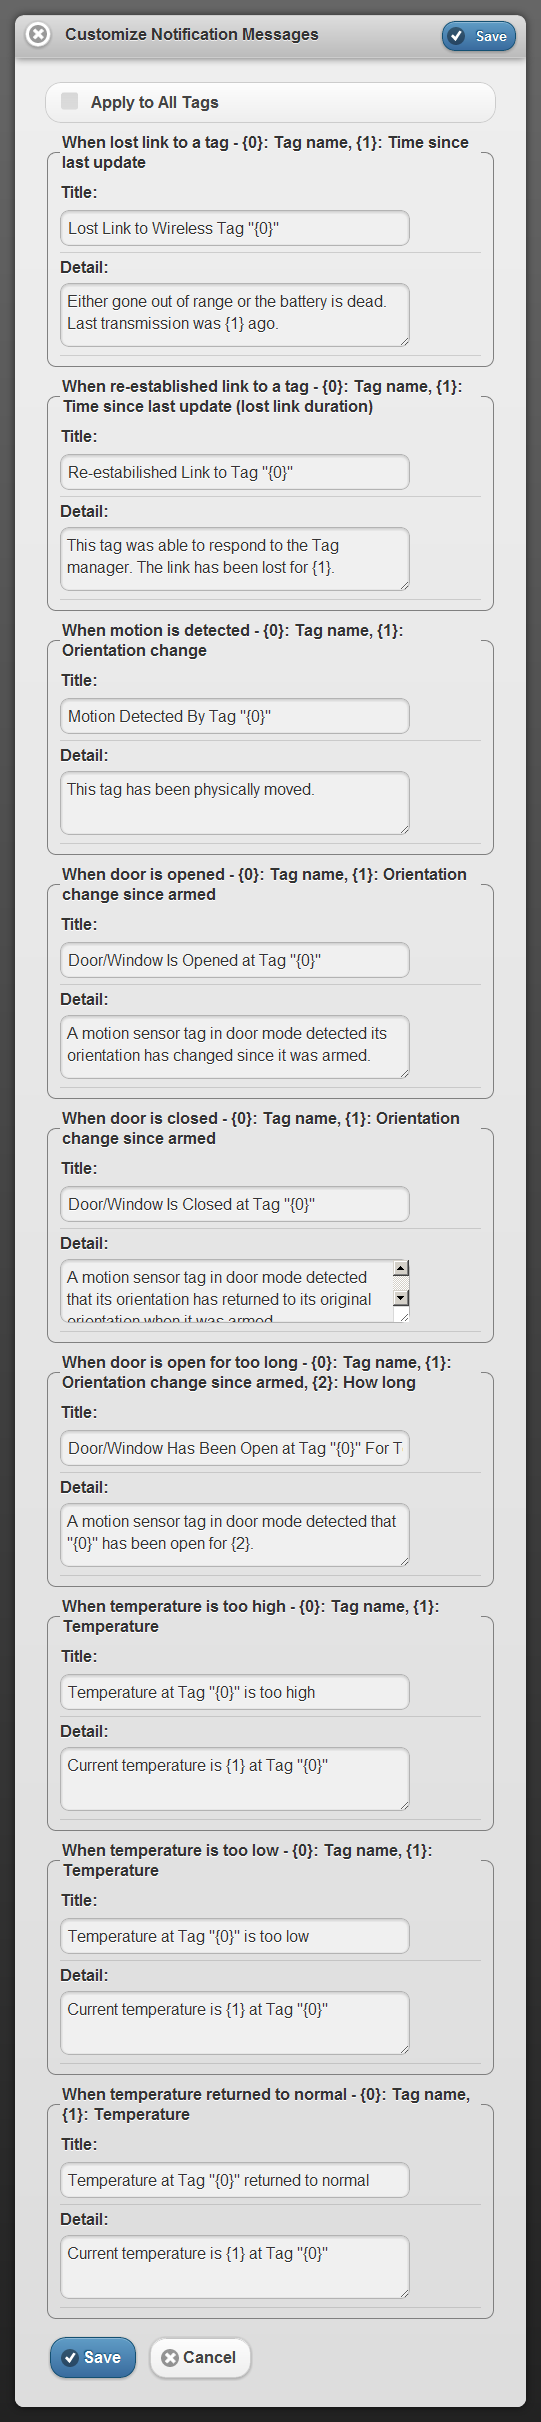
Customize Notification Messages
You can customize each type of notification messages for each tag individually or all tags by defining a custom template. Each template may include placeholders such as "{0}" or "{1}" which will be replaced with different information for each type of message. See a full list of customizable notification messages.

Click the ">" button then choose "Customize Messages...".

For example, let's change the message sent when this Tag (Wallet) is out of range to a simpler one.

The Tweet sent when the tag "Wallet" is out-of-range now uses specified custom message. Notification message for other tags are not affected unless "Apply to All Tags" is checked.
Wireless Settings
Wireless Settings allows you to re-program the flash memory in each tag to use a different frequency to resolve interference problems, and to achieve a desired balance between range, battery life and response time.
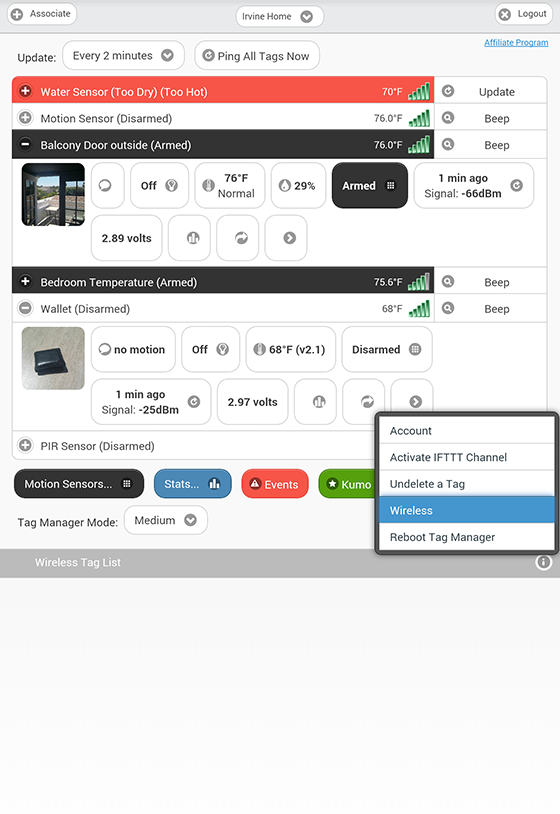
Click the "Settings..." button at the very bottom and choose "Wireless."

The system remembers the previous (Old) settings and use it for tags whose flash memory failed to update. When you modify any of the "New Setting", estimated range and battery life will be calculated.
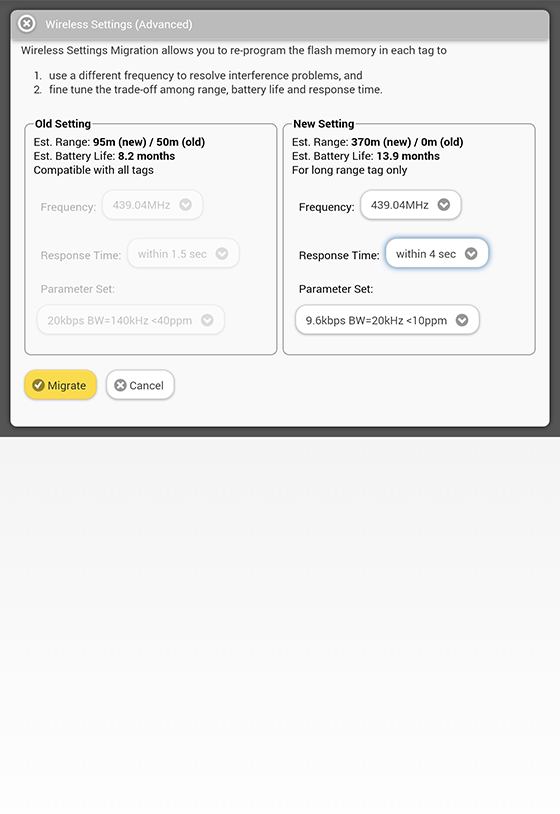
The longer the response time, or the faster the data rate, the longer the battery life. But faster data rate reduces range. Click the "Migrate" button and Tag Manager will attempt to update the flash memory of all tags to use the new settings.

When a tag failed to be updated, its "Beep" button becomes a "Migrate Setting" button. Click on it to retry updating its flash memory. Before update succeeds, Tag Manager communicates with that Tag using the old wireless setting. Alternatively, click the ">" button and then "Use new wireless setting" if in fact the tag has migrated successfully but did not get recognized that way.
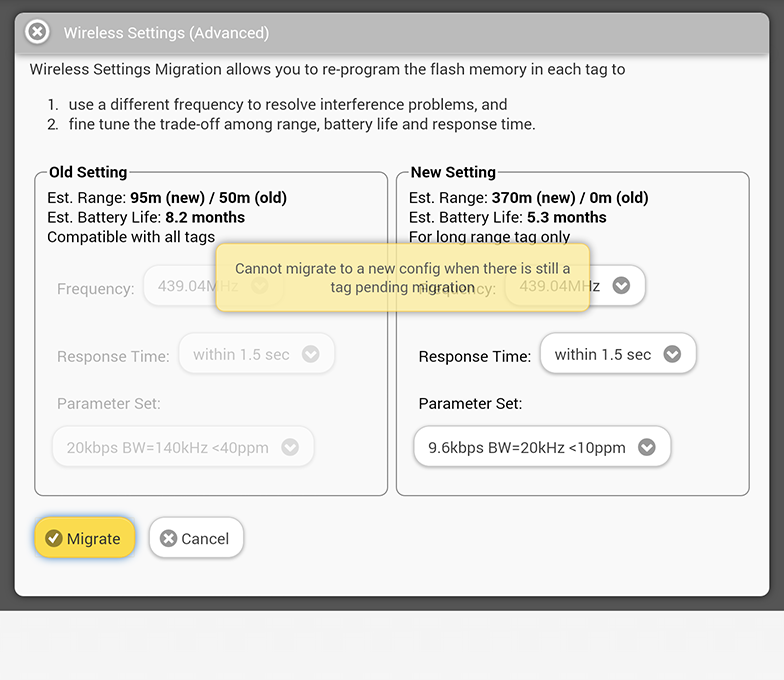
Since the Tag Manager has to remember the old wireless setting when there is still tag using it, you cannot introduce a third wireless setting until all tags on your tag list finishes migration to the new setting.
Using More Than One Tag Manager
Use multiple tag managers to cover a wider area, enable tags to "roam" from one area to another, or manage more than 40 tags at one time.

Click the "Settings..." button at the bottom of screen and choose "Account" to open account settings, where you can add tag managers to your account.
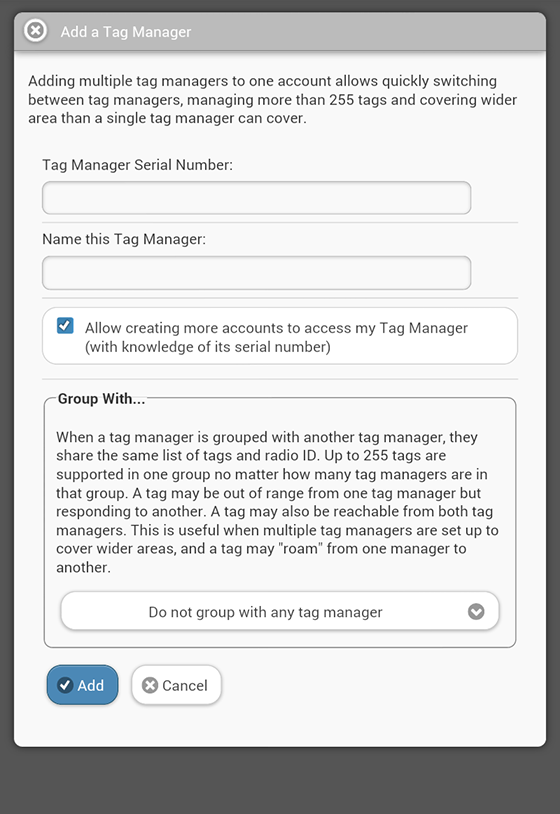
Click "Add a New Tag Manager" button to open this screen. When a tag manager is grouped with another, they manage the same list of tags. Otherwise, it has its own list of (up to 40) tags.
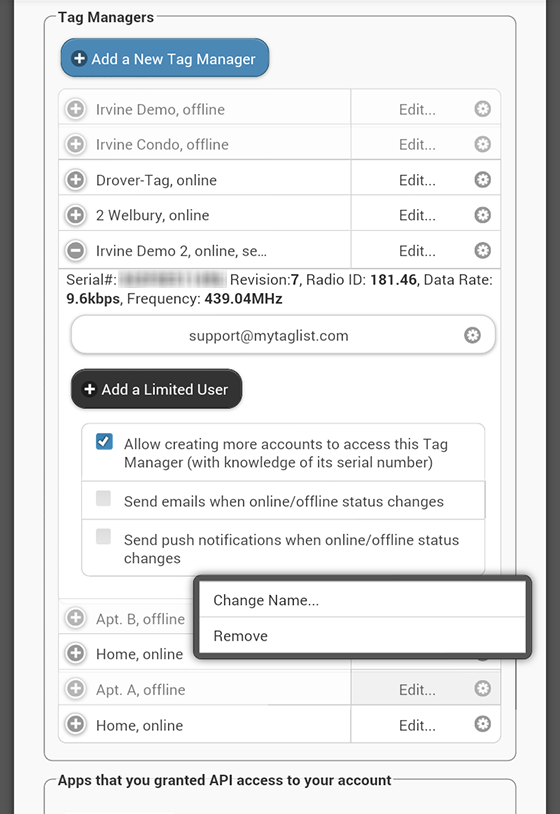
You can see the list of tag managers added to your account, if they are online or offline, and change their name, or remove them. Changes made to the list is not applied until you click "Save" button.
When a tag manager is not grouped with another tag manager, each has its own list of tags. Use the drop down at the top bar to quickly switch between tag lists.

While an event is received from one of your tags not on the tag list you are currently switched to, the popup will contain a link "View.." to allow you to click/tap...

... to switch to the right tag manager, to view details of the event.